Click on photos to enlarge.
You may print a copy of this pattern or access a free PDF via Ravelry.
Do not sell or redistribute pattern as your own.
Granny Square Ottoman Cover
If you have questions about this pattern or need help with a particular problem, let me know! I'm happy to answer any questions. You can email me at shopannavirginia@gmail.com.
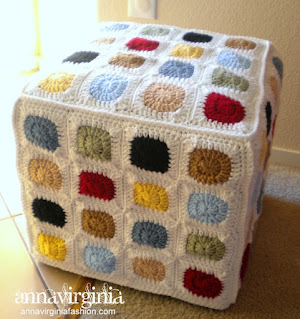
Background info: I’m proud of how this turned out, and I think some of you out there might like to create a cover, too. I found a couple of pictures online of crocheted ottoman covers, but there aren’t a whole lot. And less with patterns. In fact, I didn’t find any with a free pattern that was like this. So, I’ve prepared a pattern for your use.
Supplies:
Hook: 5.0 mm (H) or size to get square dimensions needed
Yarn: Worsted weight
3-4 skeins of main color (ei: White)
Various colors of yarn (doesn’t take much
Other: Measuring tape
Yarn needle
Ottoman to cover!
First, you will need to take measurements of the ottoman. For mine, I divided the measurements by four. This way I would get 4x4 squares on each side.
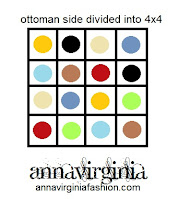
If it’s a cube, then it will be easy to figure out how to divide the squares up. If it’s a rectangle, then maybe you’ll want to do it differently. Here is what a side of the ottoman would look like:
You’ll then want to figure how many colors you’d like to use. I had eight colors, and with 16 squares per side, that meant using the color twice on each side.
Then, multiply the number of each color by 5 so that you get how many overall squares of each color. In my case, that was 2 (colors per side) by 5 (sides) meant that I needed 10 squares of each color for the entire ottoman.
Okay, so once you’ve figured that all out, you can
Start crocheting!
Note: starting ch counts as dc
For each circle, use a Color.
Rnd 1: Ch 4. 11 dc in first ch. Sl st to top of first ch. (12 dc)
Rnd 2: Ch 3. 2 dc in each st. Sl st to top of first ch. (24 dc)
Switch to White.
Rnd 3: In any st, attach new color and ch 3. In same st: (1 dc, 1 tr, 2 dc). *Dc in next 5 sts. In next st: (2 dc, 1 tr, 2 dc). Repeat from * 2 more times. Sl st to top of first ch. Fasten off.
Make sure the square adds up to the measurement you need (mine was 3.5 inches, if you remember from above)
If this doesn’t add up to the size you need, then you may want to modify a bit. Add more rows to get a bigger square. If you need a smaller square, then do Rnd 3 in hdc or sc instead.
Create as many squares as you calculated that you’ll need in each color.
Next, start sewing!
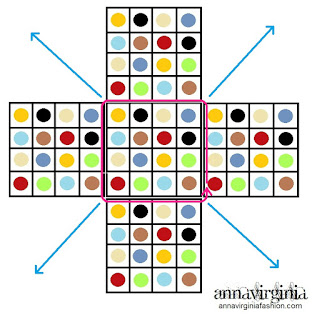
Arrange the squares according to color as you prefer. Here’s how I did mine:
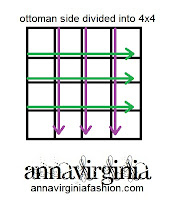
Sew each square to each other. I recommend sewing in long lines as follows: Attach squares together in a continuous line running vertically (ei: purple arrows below). Then close gaps by attaching squares in a continuous line in the horizontal direction (ei: green arrows below). I only stitched through back loops (second picture below) because it adds a little texture, but you can sew through both loops if you prefer.
Complete square sewing each square arrangement for each side of the ottoman (5 sides).
Crochet border!
Attach White in a st on side of square. Sc around entire border, doing 3 sc in each corner (shown in second picture below).
Next, attach each large square to another square to make a cube. I crocheted each portion together using sc. If you don’t want the ridges made by sc attachment, then you can sew the sides together.
Start by attaching squares together by crocheting (or sewing) around in a continuous line following pink arrows in first image. This is done by arranging each of four large squares lining up a side around one large square. Then attach from each corner down the sides (blue arrows).
Finishing!
Attach White to stitch to bottom of cube line. Sc crochet in each st around. Add extra rows if ottoman doesn’t quite reach the floor. Weave in loose ends. Pull on your ottoman and admire!
If you used and appreciated this or any other free pattern on my site, please consider purchasing from my Ravelry Shop. Thanks!
This pattern is licensed for personal use only.
No item made using this pattern may be sold.
All Rights Reserved.


.JPG)
.JPG)


.JPG)
.JPG)
.JPG)

